Android M "App Links" implementation in depth
At Google I/O 2015, a new feature was announced that allows “app developers to associate an app with a web domain they own.” This is intended to minimise the number of times a user sees the “Open with” dialog to choose which app, among those that can handle a certain URL, should be used to open a link.
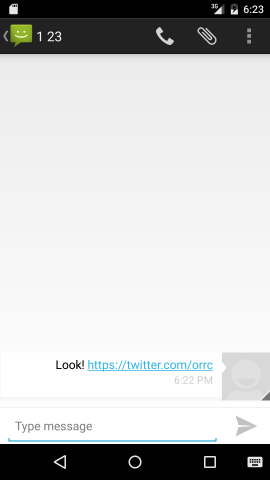
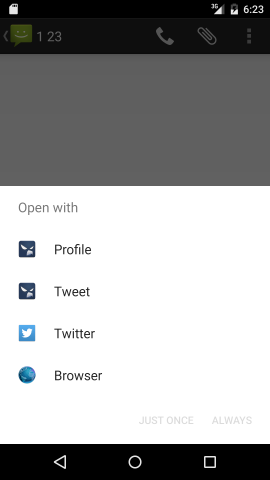
For example, with two Twitter apps installed — the official client, and Falcon Pro — when you click on a Twitter URL from somewhere, you will currently see a dialog like this:


With Android M — and with an app that has explicitly opted-in to App Linking — this dialog will no longer be shown. Clicking on a link will open the official app immediately, without prompting the user; there will be no chance to use a third-party app, or even a browser.
In this example, when you click on that link, the Android system checks whether any of the apps that can handle twitter.com URLs have auto-linking enabled. The system then verifies with twitter.com which app(s) may handle links for that domain, so that we can avoid prompting the user. Note that Android does not actively verify these links on demand, so there is no blocking on the network before Android decides which app to use. More about that later.
While this will make Android more convenient — in the majority of cases, you do want clicking a link to open the most appropriate app — it seems bad for people who prefer to use third-party apps. But note that this behaviour can be turned off from the system settings in Android M, on a per-app basis.
Implementing App Links as an app developer
The basic implementation details can be found on the Android Developers’ Preview Site.
If you have an app that handles links for, say, example.com, you must:
- Have the ability to upload files to the root of
example.com- Without this, you can’t have your app automatically be the default for opening these links
- Update your
build.gradlewithcompileSdkVersion 'android-MNC' - Add the attribute
android:autoVerify="true"to each<intent-filter>tag that contains<data>tags for HTTP or HTTPS URLs
Verification is done per hostname and not per intent filter, so you don’t technically need to add this attribute to each tag if you have multiple, but it doesn’t hurt.
Creating a JSON file
To allow Android to verify that your app should be allowed to use the app linking behaviour, you need to supply a JSON file with the application ID and the public certificate fingerprint of the APK(s) in question.
The file must contain a JSON array with one or more objects, one per app ID you wish to verify:
[
  {
    "relation": ["delegate_permission/common.handle_all_urls"],
    "target": {
      "namespace": "android_app",
      "package_name": "com.example.myapp",
      "sha256_cert_fingerprints": ["6C:EC:C5:0E:34:AE....EB:0C:9B"]
    }
  }
]
For example, if you have a com.example.myapp release version, and a com.example.myapp.beta beta version, you can allow both to be verified by specifying two objects in the array, each with the respective application ID and certificate values.
Note that the validation of this file is very strict: every object in the array must look exactly like the one here. Adding any other objects to the array, or additional properties to an object will cause validation to fail entirely — even if the object for the app in question is valid.
It seems that you can specify multiple SHA256 certificate fingerprints per app, in case you sign the same build with different keys for some reason. In any case, this fingerprint can be obtained via:
echo | keytool -list -v -keystore app.keystore 2> /dev/null | grep SHA256:
Uploading the JSON file
Having created this file, you must upload it and ensure it’s available at the verification URL: http://example.com/.well-known/statements.json.
Currently this URL must be accessible via HTTP; the final M release will only attempt to access the URL via HTTPS. Redirects to HTTPS, or any other redirect (whether via HTTP status codes 301, 302 or 307) seem to be ignored and treated as a failure in the first M preview release.
The scheme of the verification URL is also independent from the android:scheme values in your <intent-filter> tags. Even if you have a filter that only accepts HTTPS URLs, the verification URL still needs to be available via HTTP.
After we’ve taken a look at how Android uses this information, we’ll see how this process can be debugged.
How Android M implements App Links
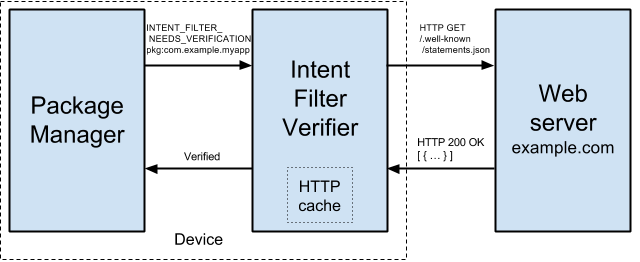
App link verification involves two components in the Android system: the Package Manager and an Intent Filter Verifier.
PackageManager is the standard component that has always been around — it takes care of verifying that APKs for installation are valid, granting permissions to apps, and otherwise being the source of truth about what’s installed on the system.
New in Android M is the Intent Filter Verifier. This is a component responsible for fetching the app link verification JSON, parsing it, validating it, and reporting back to PackageManger.
It appears that there can only be one Intent Filter Verifier active on the system, though this component isn’t something that users can easily replace — in order to register as a verifier, the android.permission.INTENT_FILTER_VERIFICATION_AGENT permission is required, which is only available to apps signed with the system key.
You can see the current active intent filter verifier via the command:
adb shell dumpsys package ifv
In the first M preview release, com.android.statementservice fulfils this role.
How App Links are verified
App link verification is done once — at install time. This is done so that, as mentioned above, the system does not need to block on the network every time you click on a link.

When a package is installed, or an existing package is updated:
- PackageManager does its usual validation of the incoming APK
- If successful, the package will be installed, and a broadcast intent with the action
android.intent.action.INTENT_FILTER_NEEDS_VERIFICATIONis sent, along with the installed package info - The Intent Filter Verifier has a broadcast receiver which picks this up
- A list of unique hostnames is compiled from the
<intent-filter>tags in the package - The verifier attempts to fetch
statements.jsonfrom each unique hostname - Every JSON file fetched is checked for the application ID and certificate of the installed package
- If (and only if) all files match, then success is signalled to PackageManager; otherwise failure
- PackageManager stores the result
If verification fails, app link behaviour will not be available to your app until verification succeeds — your app will appear in the “Open with” dialog as usual (unless another app has passed verification for the same hostname). As far as I can tell, verification is only attempted once per install or upgrade, so the next chance to pass verification for most users will be when they next upgrade your app.
Intent Filter Verifier behaviour
Hostnames
Note that example.com and www.example.com are treated as separate hostnames. This means your statements.json must be reachable directly at both hostnames.
For example, if you automatically redirect all requests to http://www.example.com/* to https://example.com/*, then this will cause verification to fail for this one hostname, and therefore app link verification as a whole will fail.
In this case, you would have to add special cases to your web server configuration to ensure that every request for statements.json directly returns an HTTP 200. Possibly this rule will be relaxed in future releases.
Response time
If the verifier cannot create a connection to your web server and receive an HTTP response within five seconds, verification will fail.
Lack of connectivity
Likewise, if the device is offline when verification starts, or has a bad connection, verification will fail.
HTTP caching
The current implementation of the Intent Filter Verifier respects regular HTTP caching rules for the most part.
If your statements.json response contains a Cache-Control: max-age=[seconds] header, the response will be cached on disk by the verifier. Though max-age values under 60 seconds are ignored; in fact 60 seconds seem to be added to all max-age values (for some reason). Similarly, an Expires header is also respected when caching responses.
If you have ETag or Last-Modified headers, then the verifier will attempt to make a conditional request using these values the next time it attempts to verify the corresponding hostname.
Though from what I’ve seen, if these headers exist but without explicit cache control headers, the response will be cached for a possibly indefinite length of time.
Cache headers are only respected for HTTP 200 responses. If you have a 404 response with any sort of cache expiry headers, these will be ignored the next time the verifier needs to contact your hostname.
Debugging App Links
When the Android system attempts to verify your app link setup, there is little feedback aside from a true/false value reported by PackageManager to logcat, e.g.:
IntentFilter ActivityIntentInfo{1a61a0a com.example.myapp/.MainActivity}
 verified with result:true and hosts:example.com www.example.com
However, you can ask the system at any time for the app linking verification status of your package:
adb shell dumpsys package d
This will return a list of verification entries like this:
Package Name: com.example.myapp
Domains: example.com www.example.com
Status: always
There may be multiple entries for your package: one for the system, and zero or more for users on the system, whose preferences override the system value.
The possible status values seem to be:
- undefined — apps which do not have link auto-verification enabled in their manifest
- ask — apps which have failed verification (i.e. ask the user via the “Open with” dialog)
- always — apps which have passed verification (i.e. always open this app for these domains)
- never — apps which have passed verification, but have been disabled in the system settings
If you didn’t manage to pass verification, you can retry by simpling reinstalling the same version, e.g.:
adb install -r app/build/outputs/apk/app-debug.apk
If you can’t see the statements.json URL being requested on your web server at install time, you can clear out the Intent Verifier Service HTTP cache, so that next time it will have to hit the server:
adb shell pm clear com.android.statementservice
If you have doubts about whether the statements.json contents are returned correctly, you can use the -tcpdump option of the Android emulator to check exactly what’s being sent over the network — though note this won’t work so simply once the final M release is out and encryption is required.
Alternatively you can use the -http-proxy option of the emulator and pass all network requests through a proxy like Charles.
Conclusion
Although I was initially sceptical about App Links due to a perceived takeover of the existing, amazing intent system of Android, I’m glad to see that it should help in most cases, and there is a very simple way to turn this off in the cases where users don’t like it.
Given that the JSON parsing and HTTP request behaviour are remarkably strict in the verifier service, hopefully some of the detailed information here will help you with your implementation of app linking.
Good luck!